Understanding digital audio and optical audio connections
What Makes Digital and Optical Audio Connections Different?
When setting up a home theater projector, understanding the types of audio connections is key for achieving high quality sound. Digital audio and optical audio are two common formats used to transmit sound from your projector to devices like a soundbar or surround sound system. Both offer clear, low loss transmission, but they use different technologies and cables.
- Digital audio often refers to signals sent via HDMI or coaxial cables. These connections can carry multi-channel audio, including digital DTS surround sound, and sometimes video as well.
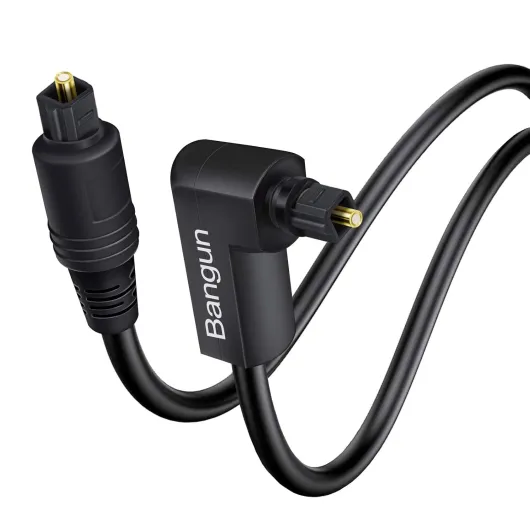
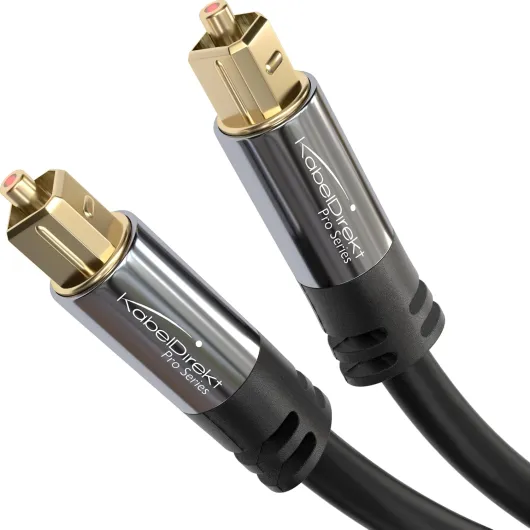
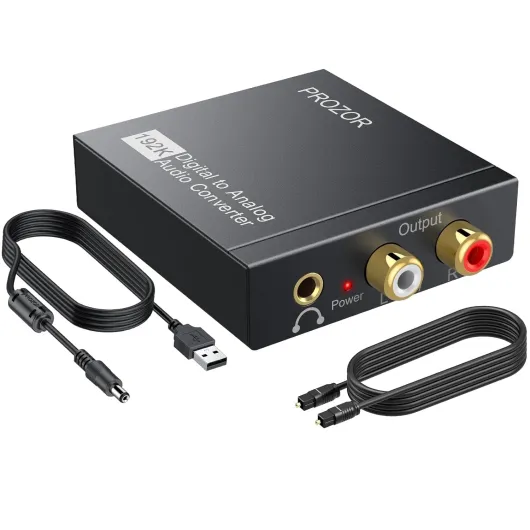
- Optical audio (also known as Toslink or fiber optic) uses light to transmit sound through a fiber optic cable. This method is immune to electrical interference, making it a top choice for clean audio in home theaters.
Optical cables are sometimes labeled as Toslink digital, mini Toslink, or simply optical cable. They’re widely available on platforms like Amazon, often with free delivery and a range of price points. Many products are rated by stars and reviews, helping you choose a high quality, low loss option for your setup.
Why Use a Converter or Adapter?
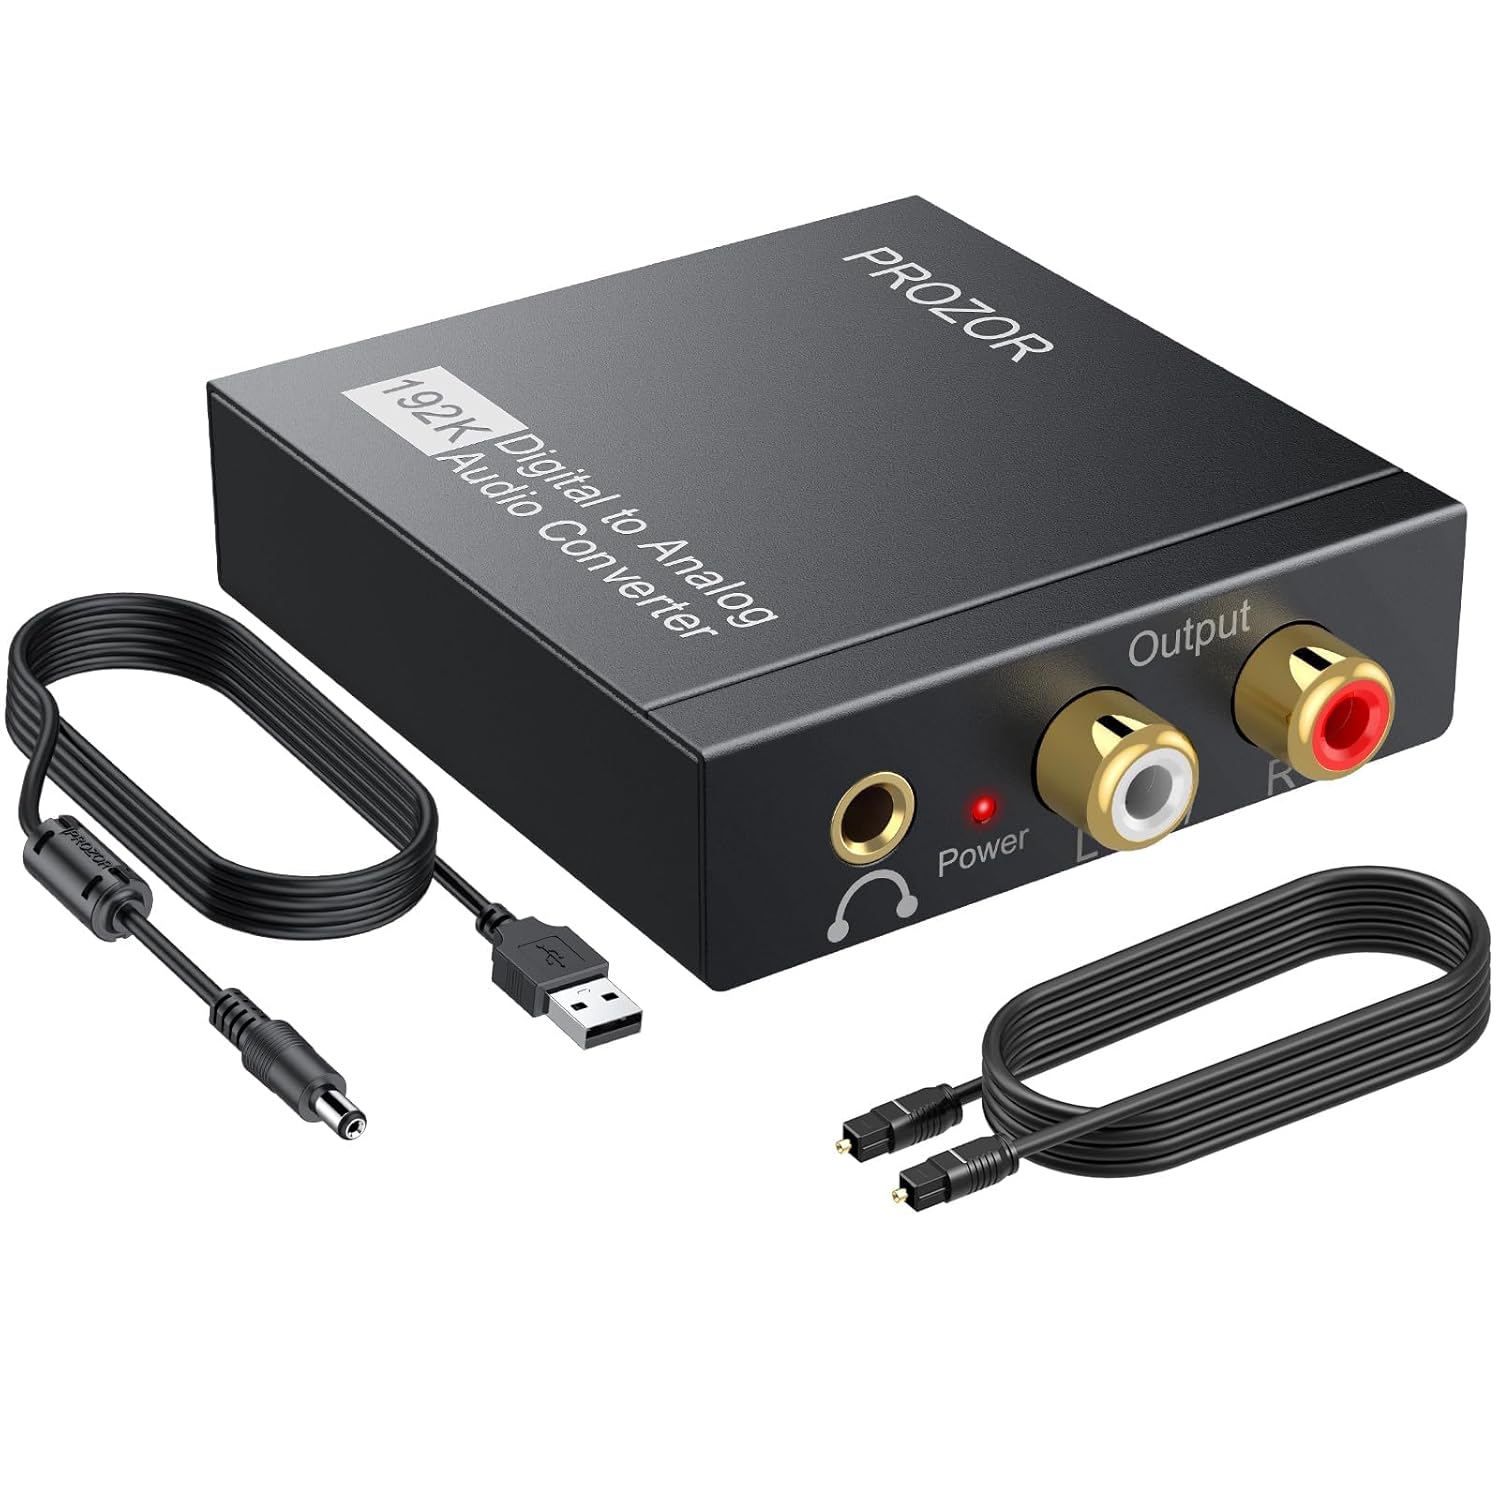
Not all projectors and audio systems have matching ports. For example, your projector might have a digital audio output, while your sound bar or receiver only supports optical audio. In this case, a digital to optical audio converter or adapter bridges the gap. These adapters are designed to support various formats, including digital optical and audio optical, ensuring compatibility between devices.
When shopping for a converter or adapter optical, check product specifications for support of formats like digital DTS and surround sound. Also, look for features such as free delivery, United States shipping, and positive reviews for peace of mind.
Choosing the Right Cable for Your Home Theater
Whether you need a standard optical audio cable, a mini Toslink, or a fiber optic cable, selecting the right product is crucial for optimal sound. Look for cables that advertise high quality, low loss transmission, and compatibility with your devices. Some cables also include features like gold-plated connectors or CLS fill for added durability.
For those with longer cable runs or complex setups, consider how an active USB extension cable can enhance your home theater projector setup. This can help maintain signal quality over greater distances, especially when integrating multiple audio and video components.
Understanding these basics will make it easier to connect your projector and enjoy immersive, high quality audio in your home theater.
Why use a digital audio to optical audio cable with your projector
Benefits of Using Digital Audio to Optical Audio Connections
When setting up a home theater projector, getting the best sound is just as important as the picture. Many projectors and sound systems now support digital audio, which delivers clearer, high quality sound compared to analog connections. Using a digital audio to optical audio cable—sometimes called a Toslink or fiber optic cable—lets you transmit audio signals with low loss and minimal interference. This is especially useful if you want to enjoy surround sound or digital DTS formats from your projector to your soundbar or audio receiver.
Why Choose Optical Over Other Audio Connections?
Optical audio cables use fiber optic technology to send digital signals as pulses of light. This means you get a cleaner signal, free from electrical interference that can affect traditional copper cables. If your projector has a digital audio output and your soundbar or receiver has an optical input, using an optical cable or a digital to optical converter or adapter ensures compatibility and top sound quality. Products like mini Toslink adapters or digital optical converters are available on platforms like Amazon, often with free delivery in the United States and a range of prices and star ratings to help you choose the best option for your setup.
When Do You Need a Converter or Adapter?
Some projectors output digital audio through HDMI or a coaxial port, while your sound system may only have an optical input. In this case, a digital audio to optical audio converter or adapter bridges the gap, allowing you to connect devices that otherwise wouldn’t be compatible. Look for high quality, low loss products that support the audio formats you need, such as digital DTS or surround sound. Many of these adapters are compact and easy to install, making them a practical addition to your home theater setup.
- Optical audio cables (Toslink, mini Toslink) are ideal for transmitting high quality sound over longer distances without degradation.
- Digital audio to optical adapters ensure compatibility between different devices and audio formats.
- Check product reviews and star ratings on sites like Amazon to find reliable cables and converters with free delivery options.
For more advanced setups, such as integrating remote control systems, you might want to explore how to use a repeater IR system for your home theater projector to further enhance your experience.
Checking compatibility with your projector and audio system
How to Know If Your Projector and Audio System Are Compatible
Before you buy a digital audio to optical audio cable or a converter, it’s important to check if your home theater projector and audio system support these connections. Not all projectors or soundbars have the same ports, and using the wrong cable or adapter can lead to frustration or poor sound quality.
- Projector Outputs: Look for digital audio outputs on your projector. Common options include HDMI ARC, digital coaxial, or a dedicated optical (Toslink) port. Some models may only have analog outputs, which won’t work with a digital optical cable without a converter.
- Audio System Inputs: Check your soundbar, AV receiver, or surround sound system for optical audio (Toslink) inputs. These are often labeled as “Optical In” or “Digital Audio In.” If your system only has an aux jack or RCA, you’ll need a digital-to-analog adapter.
- Supported Audio Formats: For the best surround sound experience, confirm that both your projector and audio system support digital DTS or Dolby Digital over optical. Some devices only support stereo PCM over optical, which can limit your audio quality.
- Product Specifications: Always review the product details on trusted sites like Amazon or the manufacturer’s website. Look for terms like “digital optical,” “fiber optic,” “Toslink digital,” or “mini Toslink” in the specs. Check for high quality, low loss cables and adapters with good star ratings and free delivery options in the United States.
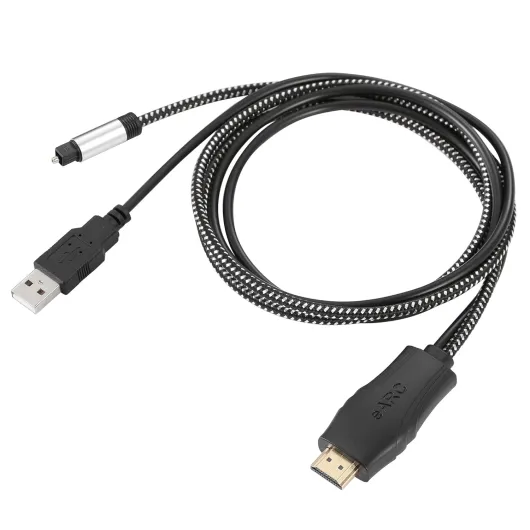
If your projector only has HDMI output and your sound system only accepts optical, you’ll need an HDMI audio extractor or adapter optical converter. These products split the audio signal from HDMI and send it to an optical cable for your soundbar or surround sound system.
For more on how your room setup can affect sound, explore this guide on how a baffle wall transforms your home theater projector experience. It covers acoustic improvements that go hand-in-hand with the right cable and connection choices.
Taking a few minutes to check compatibility and product support will save you time and help you achieve top sound quality with your projector and audio system.
Step-by-step guide to connecting your projector with a digital audio to optical audio cable
Gathering Your Equipment and Cables
Before you start, make sure you have all the necessary components. You’ll need your home theater projector, a digital audio to optical audio converter or adapter, the appropriate digital optical (Toslink) cable, and your audio system (like a soundbar or surround sound receiver). Some projectors may have a mini Toslink or a standard Toslink optical output, so check your projector’s manual for details. If your audio system only supports aux jack or HDMI, you may need an additional adapter.
Connecting the Digital Audio to Optical Audio Converter
- Plug the digital audio output (often labeled as SPDIF or coaxial) from your projector into the input port of your converter or adapter.
- Connect one end of your fiber optic (Toslink) cable to the optical output on the converter.
- Attach the other end of the optical cable to the optical input on your soundbar, AV receiver, or other audio product.
Configuring Your Projector and Audio System
- Power on your projector and audio system.
- Navigate to your projector’s audio settings menu. Set the audio output to digital or optical, depending on your model’s options.
- On your soundbar or AV receiver, select the correct input (often labeled as Optical, Digital, or Toslink).
Testing and Adjusting for High Quality Sound
Play a movie or audio file to test the connection. Listen for clear, high quality sound with low loss and support for surround sound or digital DTS if your system allows. If you experience issues, double-check that all cables are securely connected and that your converter or adapter is compatible with your devices. Some users in the United States prefer products with high star ratings and free delivery on platforms like Amazon, so consider product reviews and price when choosing your cables and adapters.
| Component | Connection Type | Notes |
|---|---|---|
| Projector | Digital audio out (SPDIF/coaxial) | May require adapter for mini Toslink |
| Converter/Adapter | Digital to Optical | Ensure compatibility with both devices |
| Optical Cable | Toslink/Fiber optic | Look for low loss, high quality cables |
| Audio System | Optical in (Toslink) | Soundbar or surround sound receiver |
For the best experience, choose top-rated cables and adapters that support digital optical audio and offer features like free delivery and reliable support. This setup helps you enjoy immersive sound with your home theater projector, whether you’re streaming movies or gaming.
Troubleshooting common issues
Solving Audio Connection Problems
If you’re not getting sound from your projector to your soundbar or surround sound system, start by checking all cable connections. Make sure your digital audio cable, optical cable, or Toslink cable is securely plugged into both the projector and the audio device. Sometimes, a loose fiber optic or mini Toslink connection can cause audio dropouts or no sound at all.- Verify that your projector’s audio output is set to digital or optical, not analog or HDMI ARC.
- If using a digital to optical converter or adapter, confirm it’s powered on and compatible with your devices.
- Check if your soundbar or receiver supports the selected audio format (PCM, Dolby Digital, or DTS). Some products only support specific formats.
Dealing with No Sound or Distorted Sound
If you hear static, distortion, or nothing at all, try a different optical audio cable or digital audio cable. Low quality or damaged cables, especially those with high loss, can impact sound quality. Look for high quality, low loss fiber optic cables with good reviews and high star ratings on trusted sites like Amazon or major United States retailers. Free delivery options can also help you save on price.- Double-check that your audio cable is not bent sharply or pinched, as this can damage fiber optic strands.
- Test the projector and audio system with another device to isolate the issue.
- Ensure the adapter optical or converter is the correct type (for example, digital optical to aux jack or Toslink digital to RCA).
Resolving Compatibility and Format Issues
Some projectors or soundbars may not support all digital audio formats. If your product manual mentions support for digital DTS or surround sound, make sure your projector’s audio output matches. If you’re using a mini Toslink or Toslink optical cable, confirm it fits the port correctly. For HDMI connections, check if you need an HDMI audio extractor to convert the signal to optical audio.- Update your projector and audio system firmware if updates are available.
- Try switching between PCM and bitstream output in your projector’s audio settings.
- If you’re using a sound bar, make sure it’s set to the correct input (optical, digital, or aux jack).
When to Seek Support
If you’ve tried these steps and still have issues, consult your projector or audio system’s support resources. Many manufacturers offer free online troubleshooting, and some products come with free delivery for replacement parts. Always check the warranty and return policy, especially if you purchased through Amazon or another top retailer. For persistent problems, consider professional installation to ensure your home theater audio setup delivers the high quality sound you expect.Optimizing your home theater audio experience
Fine-tuning your audio for immersive sound
After connecting your projector with a digital audio to optical audio cable, you can take a few extra steps to get the most out of your home theater audio. The right tweaks can make a big difference in sound clarity, surround sound effects, and overall enjoyment.
- Choose the right audio mode: Many projectors and soundbars offer different audio modes like "movie," "music," or "game." Try switching between them to see which one delivers the best surround sound for your setup.
- Check your digital audio settings: On your projector or connected device, ensure the audio output is set to "digital optical" or "Toslink digital." This ensures the signal travels through your optical cable without loss.
- Adjust soundbar or receiver settings: If you use a soundbar or AV receiver, explore options for bass, treble, and balance. Some products support digital DTS or Dolby surround sound, which can be enabled for a more cinematic experience.
- Use high quality cables: A good fiber optic or Toslink optical cable can reduce signal loss and interference. Look for cables with low loss and solid build quality. Many top-rated options on Amazon offer free delivery in the United States and have high stars in customer reviews.
- Consider adapters and converters: If your projector or audio system uses mini Toslink, aux jack, or HDMI, make sure you have the right adapter optical or digital converter. This ensures compatibility and stable audio transmission.
Common upgrades and accessories
- Soundbar upgrades: Upgrading to a sound bar with optical audio support can improve clarity and volume. Some models even offer wireless subwoofers for deeper bass.
- Optical splitters: If you want to connect multiple devices, an optical splitter or switch can help you route digital audio to different products without unplugging cables.
- Cable management: Using cable organizers or fiber optic cable sleeves keeps your setup tidy and reduces the risk of damage.
Tips for best performance
- Keep your optical cable free from sharp bends or tight loops to avoid signal loss.
- Regularly check connections for dust or debris, especially on Toslink optical ports.
- Update your projector and audio system firmware if available, as manufacturers often release updates for better audio support.
With these adjustments and the right accessories, your home theater projector can deliver high quality, immersive sound that matches the visuals. Whether you’re watching movies, gaming, or streaming, optimizing your digital audio and optical connections is key to a top-tier experience.