![[Official Google TV]Smart Projector 4K Supported with WiFi & Bluetooth, Netflix-Licensed, Outdoor Movie Projector with DoIby Audio, Auto Focus, Home Theater Proyector WIMIUS G1 (Gray, Standard) Standard Gray](https://www.home-theater-projector-guru.com/storage/544370/conversions/81r73FLCQ-L._AC_SL1500_-medium.webp)
Understanding the Basics of Projector Blending
Grasping the Fundamentals of Projector Blending
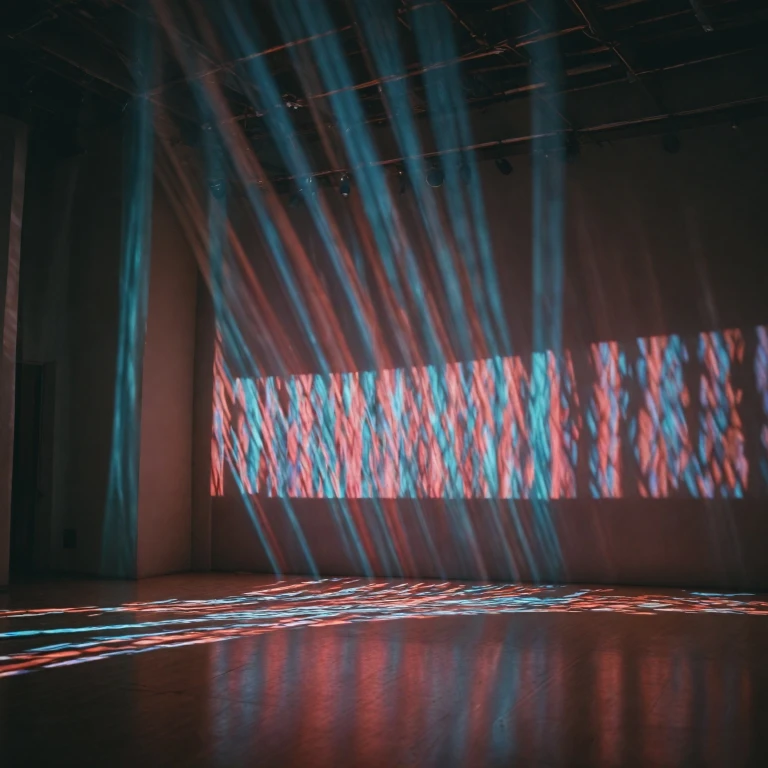
Projector blending is an innovative technique that allows you to merge the images from multiple projectors into a single, seamless image. This process, often referred to as edge blending, is crucial for creating a larger image that maintains high quality and clarity. When done correctly, it can transform your home theater into a stunning video wall, offering an immersive viewing experience.
At its core, blending involves overlapping the edges of the images projected by each device. This overlap is where the magic happens, as it allows for the creation of a single image that appears continuous and uninterrupted. The key to successful projection blending lies in the precise alignment and calibration of the projectors, ensuring that the images projectors display are perfectly synchronized.
Understanding the basics of blending projectors is essential before diving into the technical aspects. You need to consider the image size you want to achieve and the space available for your setup. A single projector might not suffice if you're aiming for a larger image, hence the need for multiple projectors. The choice of projectors will also impact the quality of the final image, as different models offer varying levels of brightness, contrast, and resolution.
For those new to this concept, it might be helpful to explore the longest throw projectors as they can offer insights into achieving the desired image size and quality. As you delve deeper into the world of projector blending, you'll discover that the right equipment and setup can significantly enhance your viewing experience.
In the following sections, we'll discuss how to choose the right projectors, set them up for optimal blending, and explore software solutions that support this process. Additionally, we'll address common issues you might encounter and how to troubleshoot them effectively. With the right knowledge and tools, you can master the art of blending projectors and elevate your home theater experience.
Choosing the Right Projectors for Blending
Selecting the Ideal Projectors for Seamless Integration
Choosing the right projectors for blending is a pivotal step in achieving a flawless video wall or edge blending setup. The ultimate goal is a seamless single image across all screens that can dramatically enhance your viewing experience. Here's what you need to consider:- Image Consistency: Ensure that the projectors have the same resolution, brightness, and color capabilities. This will create uniform images across the blend.
- Brightness Matters: Multiple projectors will create a larger image. The light output, measured in lumens, should be adequate for your screen size and room’s light conditions.
- Longer Throw Options: Opt for projectors that can support longer throw distances if your space is large. Explore the longest throw projectors for your home theater.
- Edge Blending Capabilities: Some add-ons simplify the blending process, making more harmonious transitions possible between projectors. This can be critical for achieving smooth projection blending.
- Compatibility and Connectivity: Ensure that the projectors are compatible with the blending software you intend to use. Additionally, check that they have the requisite ports and connections you need, including HDMI and others for seamless integration.
Setting Up Your Projectors for Optimal Blending
Positioning for Precision
The placement of your projectors plays a vital role in achieving optimal edge blending and producing a seamless image. It is important to set multiple projectors in such a way that their individual projection areas overlap precisely. This overlap facilitates the creation of a single image and is crucial in projection blending.
Calibrate to Eliminate Discrepancies
Once you have strategically positioned your projectors, calibration becomes the next critical step. Calibration involves adjusting each projector image to match in color, brightness, and contrast. Given the variability in projector specifications, even among similar models, calibration ensures uniform projection blending across the screen.
Aligning Your View
Alignment is another key aspect of proper set up. Using software support or manual techniques, you will need to align the edge of each projector’s projection. This fine-tuning eradicates visible lines where projections meet, enhancing the view with a cohesive single image.
Optimizing Image Size and Resolution
Adjusting the image size is essential to cover the screen completely without distortion. Ensure that your projector's resolution is compatible across the board to create a larger image with clarity.
Professional Assistance and Add-Ons
If you encounter complex blending issues, reaching out for professional technical support can be beneficial. Additionally, using add-ons like lens shift features can make adjustments more precise, supporting a seamless projection blending experience.
For further insights on projector selection, you might find our detailed blog on choosing the ideal projector for gaming enthusiasts beneficial.
Software Solutions for Projector Blending
Integrating Software Solutions for Seamless Projection
Achieving a flawless projection blending can be a bit challenging without the right software. Implementing video and image blending technologies provides a seamless transition when multiple screens are involved. This segment will guide you through some essential software tools to create a cohesive image from multiple projectors. First and foremost, choose software compatible with your projectors. Many advanced software solutions offer features such as edge blending, where the edges of projected images can be smoothly integrated to form a single, unified projection. This is essential for avoiding the visible seams that can occur when using multiple projectors. One major feature in projection blending software is the capability to manage different image sizes. Whether working with a single or a larger image, software will create a seamless view by adjusting and scaling each projection appropriately. This tool is indispensable when crafting a video wall or using three projectors to display a continuous image. Technical support is crucial when dealing with complex systems. Choose a software provider that offers comprehensive help, whether through an online helpdesk or immediate email reply, to address any challenges that arise. This is particularly important for troubleshooting specific issues, like misaligned images or flickering. Additionally, many projection blending solutions offer add-ons for enhanced performance. These optional applications can enhance the brightness, contrast, and surprisingly, even the color of the projected image. It’s worth obtaining a quote post consultation to see what additional support could benefit your setup. In conclusion, utilizing software solutions for your projector blending can vastly improve your home theater experience. With the right tools, motivations, and support, a seamless single image can be effortlessly achieved, leaving viewers immersed without distraction. The next step involves understanding the potential challenges and how to address them promptly to ensure your projector image remains pristine.Troubleshooting Common Blending Issues
Tackling Blending Problems: Adjustments and Solutions
Blending multiple projectors into a single image can be a challenging endeavor, and issues may arise during the process. However, understanding the nuances of projection blending and utilizing some troubleshooting techniques can help refine the larger image created by the projection setup. Here are key concerns and solutions to address common blending challenges:
- Image Alignment: Achieving precise alignment is crucial to avoid visible edges on the screen. Utilize the edge blending capabilities of your software to ensure seamless transitions between projector images. Adjust each side of the projection for optimal clarity.
- Color Matching: Differences in color output can distort the unified image. Calibrate the projectors to match color profiles, ensuring uniformity across the video wall. This may involve fine-tuning settings like brightness and contrast to harmonize the projection.
- Focus Discrepancies: If one projector's image appears sharper or blurrier than others, adjust the focus settings. Remember, the projection screen should appear evenly focused when viewed from the intended audience's perspective.
- Geometric Corrections: Slight variations in projector positioning can lead to geometric distortions. Use keystone correction and lens shift features to align the projection seamlessly, minimizing warping in the single projector image.
- Technical Support: In complex scenarios, consider reaching out to the manufacturer's email support or consulting technical forums to resolve persistent issues. An expert reply can offer targeted advice specific to your projector model and setup.
By diligently applying these strategies, you can create a cohesive and immersive viewing experience using blended projectors. This effort transforms your home theater into a dynamic space where video content can be enjoyed on a grand scale.
Enhancing Your Home Theater Experience with Blended Projectors
Transforming Your Space with Projection Blending
Incorporating multiple projectors to create a single, cohesive image can transform your home theater into a professional-grade cinematic experience. With a bit of planning and the right tools, you can ensure a seamless view, enhancing the way you watch movies or play video games at home.
Blended projectors offer a larger image that surpasses the capabilities of a single projector. By setting up projectors in a precise method, you’ll create a video wall effect, perfect for large screens. Edge blending is key here, ensuring that the multiple images are woven together without visible seams.
To achieve the best results, start by selecting projectors that support edge blending; this will significantly ease the process. Your projector setup should be strategically placed using technical support and guidance to maintain the image quality across different viewing angles.
To further refine the projection, consider software solutions designed for image blending. They aid in smoothing out the edges and aligning the images projectors display, ensuring the projection appears as a single image rather than disparate frames.
A tip from the blending experts: always take advantage of the projector support forums and email replies from technical support to troubleshoot and perfect any issues you encounter with your blending projectors. Persistent problems with image size or alignment can often be addressed by adjusting settings or adding specialized software add-ons.
Although combining three projectors might seem daunting at first, patience and practice in adjusting each element, from edge blending to projection alignment, will ultimately reward you with an immersive cinematic experience in your own home.
