Understanding Projector Specifications
Diving Into Projector Specifications
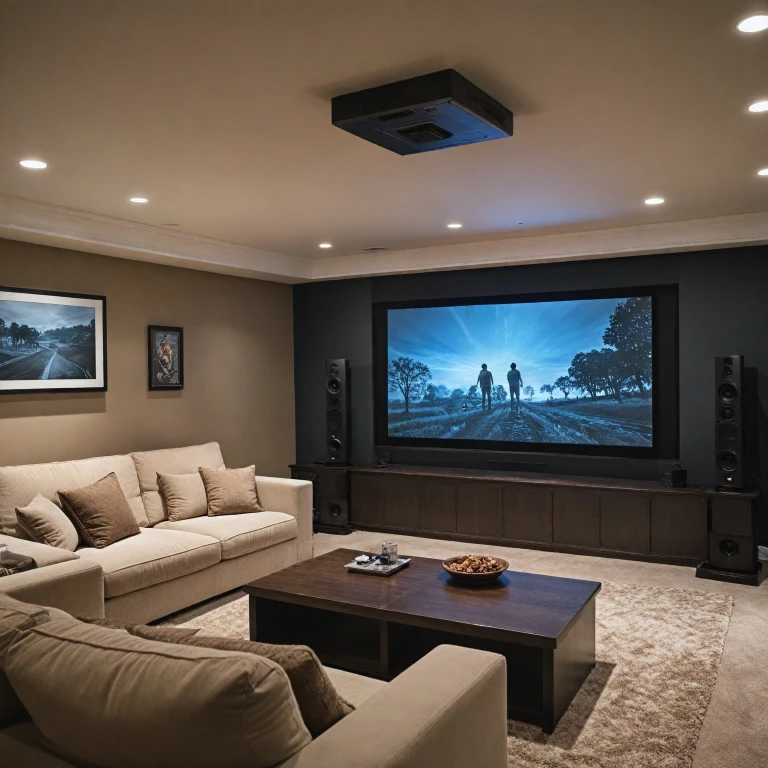
When it comes to mounting a projector on your ceiling, understanding the specifications of the projector you choose is essential. Not all projectors are created equal, and the right specifications can significantly affect the quality of your home theater experience. Here's what you need to pay attention to:- Throw Distance: The throw distance is the range from the projector lens to the screen. This will influence where you can position your ceiling mount in the room. A short throw projector can be mounted closer to the screen, which might be crucial if you have limited space.
- Screen Size: Ensure that the projector can support the screen size you plan to use. Different projectors have specific maximum and minimum screen size capabilities, which directly affects the viewing experience.
- Mounting Height: You need to consider the projector's vertical offset. This is vital because it determines how high or low the projector should be from the ceiling, ensuring the projected image properly aligns with your screen.
- Weight and Dimensions: Always check the weight and size of the projector to verify that it is compatible with your chosen ceiling mount. Using a universal projector mount can offer more flexibility, but always double-check model numbers for compatibility.
Choosing the Right Ceiling Mount
Determining the Ideal Mount for Your Projector
Selecting the right mount for your projector involves understanding the design of your projector and the structure of your ceiling. Different projectors may require mounts that cater to specific requirements such as weight, model, and throw distance. Ensuring compatibility between the projector and the mount is crucial for a secure installation.
Here are some considerations to keep in mind:
- Weight and Compatibility: Choose a universal projector mount compatible with the weight and mounting patterns of your projector model number. It's important that the mount supports not only the weight of the projector but also matches the projector's mounting holes.
- Mounting Location: Consider whether your ceiling is made of joists or drywall. For drywall ceiling installations, locate ceiling joists as they will provide stronger support for the projector mount. You might need a stud finder to locate these joists precisely.
- Throw Distance and Ceiling Height: Before installation, measure the throw distance from the projector to the screen or projector wall. Your room size and ceiling height will dictate the optimal position to mount the projector for a good view that matches the screen size.
- Adjustability: Look for mounts that allow for easy adjustments and fine-tuning, helping you achieve perfect alignment with the projector screen. This can be especially important if you're dealing with an angled ceiling or need to align the projector precisely with the center of the screen.
By considering these factors, you'll be better prepared to mount your projector securely and ensure that it aligns perfectly with your viewing screen. Moving forward, you'll want to prepare your ceiling appropriately to accommodate the mount, as discussed in the installation section.
Preparing Your Ceiling for Installation
Preparing the Ceiling: A Vital Step
Before installing your ceiling mount for a home theater projector, it's crucial to ascertain that your ceiling can support the fixture adequately. Whether you're mounting your projector from a drywall ceiling or working with ceiling joists, proper preparation will ensure a smooth installation process.
Start by determining the ceiling height and the throw distance needed for your projector. The throw distance, the distance from the projector to the screen, is a crucial specification that dictates where your projector should be installed in relation to your viewing area. Make sure that your chosen location offers the right throw to ensure your projector covers the desired screen size.
Locate the ceiling joists using a stud finder to guarantee support for your mount. If your projector is particularly heavy or if you're using a universal projector mount, securing it to at least one single joist is advisable. In scenarios where a joist isn't conveniently located, you might need to reinforce the area with additional support.
You'll also want to consider cable management solutions. Plan routes for running power, HDMI, and other necessary cables from the projector to your projector wall or screen, ensuring a clean and clutter-free finish that enhances both functionality and aesthetics.
Finally, if you have a fixed projector screen, measure and mark the center of the screen on your ceiling. This can serve as a reference point for mounting the projector as close to its ideal position as possible.
Step-by-Step Installation Guide
Installation Steps for Your Projector
Once you have your projector and ceiling mount ready, installing it correctly is crucial for optimal performance. Before you start, ensure you have gathered all necessary tools and equipment, such as a drill, screws, and a screwdriver. With everything in place, follow these steps to mount your projector securely to the ceiling:
- Locate the Ceiling Joists: Use a stud finder to identify the location of the ceiling joists. Mounting your projector on the joists rather than drywall is essential for stability and safety. If your joists are not in the desired location, consider a universal projector mount that allows you to bridge the distance between them.
- Mark the Drill Points: Once you’ve located the joists, align your ceiling mount’s base plate, ensuring it is centered with your screen. Mark your drill points accurately to fit your mount’s screws.
- Drill into the Drywall and Joists: Carefully drill holes into the marked points. Make sure you go through the drywall and into the joists for sturdiness. Avoid creating over-sized holes that could weaken the mount’s support.
- Attach the Ceiling Mount: Secure the ceiling mount to the ceiling using bolts or screws designed to support the projector’s weight. You may need a helper to hold the mount steady as you tighten the fasteners.
- Install the Projector: With the ceiling mount securely in place, attach your projector. Ensure it is aligned with the intended throw distance and check that it is centered with your projector screen. Some mounts allow for additional adjustments of the angle and direction.
After mounting, it's important to check the stability of the setup and ensure that your projector is firmly secured. This will prevent any accidental movement that could affect your viewing experience or the safety of the projector.
Cable Management Solutions
Cable Management: Ensuring a Neat Setup
To maintain a tidy theater room and prevent unsightly cables from taking away from your home cinema experience, effective cable management is key. Consider these tips to keep cables organized and hidden.- Calculate the Cable Length: Begin by measuring the throw distance from your projector to the screen and from the projector to the nearest power and connection points on the wall. This will help you determine the appropriate cable lengths needed.
- Use Cable Covers: Conceal overlapping or hanging wires with cable covers. These can easily be painted to match your ceiling or wall, providing a seamless and aesthetic look.
- Secure Cables to Ceilings: If your projector is mounted from the ceiling, ensure that cables run neatly along the ceiling using adhesive clips or Velcro ties. This is especially important if mounting from a drywall ceiling, which might require more delicate installation.
- Hide Cables Within Joists: For rooms with open or accessible joists, consider running cables within these ceiling joists to completely conceal them from view. This provides a cleaner and more professional appearance.
- Label Your Cables: It's beneficial to label or color-code your cables according to their purpose and destination. This can save you time with future adjustments or troubleshooting.
- Manage Power Supply: Ensure the power cables are routed securely and are accessible from a single joist or wall outlet, maintaining a central point for all your cable connections.
Adjusting and Calibrating Your Projector
Fine-Tuning Your Viewing Experience
Once your projector is securely mounted and the cables are neatly managed, it's time to make the final adjustments to ensure the best possible viewing experience. Properly adjusting and calibrating your projector involves several key steps:
- Set the Correct Throw Distance: The throw distance is vital for achieving the desired image size on your projector screen. Measure the distance from the projector to the screen, ensuring that it aligns with the specifications provided by your projector's model number. Adjust the projector from the ceiling if necessary to fit your room's configuration, keeping in mind the screen size and projector wall placement.
- Align the Image: Use the projector's lens shift, keystone correction, and other alignment features to ensure the image is properly centered and straight. This may involve repositioning the projector mount slightly if adjustments can't fully correct the image alignment.
- Focus the Image: Adjust the focus setting on the projector to ensure a crisp, clear picture. This is particularly important for larger screens where minor focus issues become more apparent.
- Calibrate the Colors and Brightness: Utilize the built-in settings of the projector to optimize brightness, contrast, color saturation, and other display parameters. Many projectors come with pre-set modes tailored for different viewing environments, so choose the one that best suits your room lighting and screen usage.
Remember, each room and setup is unique, so adjustments may vary based on the specific elements like ceiling height, screen size, and the distance from ceiling to projector. Taking the time to properly calibrate your projector will greatly enhance your home theater experience.