Understanding Drop Ceilings
Understanding Your Drop Ceiling System
Drop ceilings, known for their aesthetic and soundproofing capabilities, are a common feature in many homes and offices. To enhance your viewing experience with a projection system, understanding how these ceilings function is crucial.
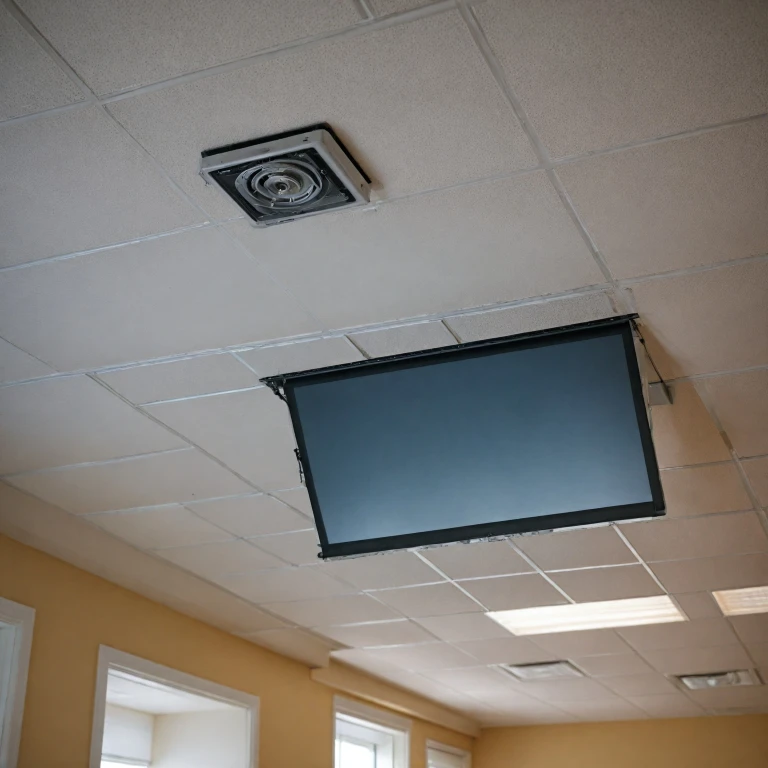
These ceilings consist of a grid supported by tiles. The creation of a void between the structural ceiling and tiled surface offers ample opportunities for modular installations, including mounting a projector screen. However, this setup requires specific knowledge concerning the mounting features and the type of support the ceiling can provide.
One advantage of a drop ceiling is its flexibility. This space can be used to pass wiring through, keeping your room tidy and free from visible cords. It also allows for positioning your projector at the optimal distance and height, achieving the desirable throw ratio and image size. Proper positioning ensures your mounted projector’s lens aligns with the center of the screen, improving picture clarity and minimizing distortion.
Before proceeding with the install, take a moment to measure the drop ceiling’s capacity, especially if the screen size is large. Accurately measure the distance from the top of the ceiling to the floor, as the floor can impact the choice of a drop screen or tension screen type.
To dive deeper into the intricacies of drop ceiling installations and enhance your setup even further, consider
enhancing your viewing experience with a wall-mounted projector screen. Understanding the advantages and requirements will help in planning your installation efficiently and safely.
Choosing the Right Projector Screen
Selecting the Appropriate Projection Surface
Choosing the right projector screen for your home theater setup involves more than just screen size and aspect ratio considerations. Whether mounting the screen to the ceiling or installing a drop screen, factors such as screen material, size, and type should align with your room's specifics and the intended use of the screen.
- Screen Size & Aspect Ratio: Measuring the available space in your room is critical. Ensure that the screen size fits the throw distance requirements. It's essential to maintain an appropriate balance between the screen width and the throw ratio of your projector. This helps in achieving a crisp, well-aligned image.
- Ceiling Mounting Types: Consider whether a tab tension or fixed-frame screen best suits your room. A ceiling mount screen allows for seamless integration, leaving your screen floor clear, while a wall mount might require additional support brackets. Make sure the mount or ceiling position supports the required height adjustments for optimal viewing.
- Environmental Factors: Ambient light in your room can significantly impact the viewing experience. Screens specifically designed to combat ambient light can maintain clear and vibrant images even in brighter environments. Projection screens with lens shift capabilities also offer flexibility in aligning the projector lens with the center screen.
With an understanding that no single choice fits all, evaluating the merits of different screens and projector ceiling mounts is key. For additional insights on the largest projector screens available for home theaters, you can check more details from
Exploring the Largest Projector Screens. This ensures that your setup is tailored for the best cinematic experience.
To successfully mount a projector screen to a drop ceiling, having the correct tools and materials at hand is crucial. Ensuring you have everything prepared will save time and reduce stress. Here’s a comprehensive list of what you will need and why each is important:
- Projector Mount: Essential for attaching your projector screen securely to the drop ceiling, the mount should match your projector's weight and dimensions.
- Mounting Bracket: This will help support the screen. Be sure the bracket is compatible with both the projector and the ceiling type.
- Screwdriver Set: A variety of screwdrivers will be needed to tighten screws and make adjustments during installation.
- Stud Finder: Invaluable for locating ceiling supports or structural elements to ensure the mount is reinforced adequately.
- Level: A level is vital for aligning the screen perfectly so the image is not distorted by a skewed position.
- Measuring Tape: Accurate measurements ensure the projector’s throw distance and image ratio fit the room setup perfectly. Knowing the screen size and screen width can help gauge distance.
- Pencil and Markers: Used for marking alignment points on the ceiling.
- Drill with appropriate drill bits: For creating holes to secure the mount and bracket.
- Safety Equipment: Goggles and gloves to protect during the drilling and mounting process.
Equipped with these tools and supplies, you are ready to proceed with the installation process, whether it involves a top screen or bottom screen setup. Positioning the projector ceiling mount properly with regard to the lens and throw ratio is paramount for ensuring an optimal viewing experience. Once you’ve assembled these materials, you can confidently move forward with securing your drop screen. If you're looking for a step-by-step guide to ensure accurate and secure attachment, consider reviewing detailed
guidance on installing a projector ceiling mount for suspended ceilings.
Step-by-Step Installation Guide
Installation Process Explained
Installing a mechanical projector screen to a drop ceiling requires careful attention to detail to ensure a smooth and seamless setup. Here’s a step-by-step guide to assist you in mounting your projector screen effectively:
- Identify the Ideal Position
- Start by determining the optimal location for your screen. The center of the screen should align with the projector’s lens. Consider the throw ratio and the throw distance, as these will affect the image size and clarity.
- Measure the screen size, including the screen width and height, and ensure it's suitable for your room and viewing conditions. The bottom screen should be comfortably visible from the sitting area.
- Marking Drill Points on the Drop Ceiling
- Once you've selected the best position, use a pencil to mark the drill points on the drop ceiling panels where the brackets will be installed. Ensure these marks align with the center lens of the projector.
- Consider the top screen and bottom screen positions to maintain an even image ratio across the projection screen.
- Mount the Brackets
- Attach the mounting brackets firmly onto the drop ceiling using the appropriate ceiling mount hardware. Ensure these brackets hold securely to avoid any accidental shifts in the future.
- Align the Projection Screen
- Carefully unroll the projector screen. Secure it to the mounted brackets while ensuring the screen is level. This prevents any distortion in the projected image.
- Pay attention to any ambient light in the room that may affect the screen's visibility. Using a tab tensioned screen may help in maintaining a flat and clear image.
- Connect and Test Your Projector
- Position your projector mount accordingly, ensuring the projector lens aligns with the center of the screen. This alignment is crucial for maintaining an accurate throw ratio.
- Once the projector is in place, project an image onto the screen to verify everything is aligned correctly. Make adjustments as necessary, using the lens shift feature if available.
Following these steps will help ensure your mechanical projector screen is securely and effectively installed to your drop ceiling, providing an optimal viewing experience every time.
Safety Considerations
Prioritize Safety in Installation
When securing your home theater projector screen to a drop ceiling, safety should always be a primary concern. Ensuring the stability and security of the screen and mount is crucial to avoid any accidents in your room.
- Weight Considerations: Before mounting anything to your ceiling, make sure the drop screen and projector mount can safely support the weight of your projector and screen. Check the weight capacity of the ceiling mount and ensure it matches the specifications of your screens.
- Secure Mounting: When positioning the ceiling mount for your projector, it’s essential to find a reliable point that can hold the weight. Avoid using spaces between ceiling tiles as mounting areas, as they are not structurally sound.
- Cable Management: Running the necessary cables for your projector and screen should be done carefully to prevent tripping or damaging the wires. Use cable covers or raceways to keep cables organized and away from high-traffic areas.
- Ambient Light Management: For optimal image quality, consider how ambient light affects your screen. Position the projector and screen in a manner that minimizes light interference, and use lens shift and throw ratio adjustments effectively.
- Double Check Alignments: When mounted, ensure that the projector lens is centered with respect to the screen. Adjust the projector mount alignment for the correct throw distance and check that the top and bottom screen heights align smoothly.
- Use Tab Tension Screens: For maintaining screen flatness, a tab tension projection screen can be beneficial. It prevents the screen from curling, ensuring that the image remains flat for precise projection.
- Height and Position Verification: Properly verifying the installation height and position of your projector screen and ceiling mount is vital for maintaining the correct image ratio and screen width.
- Routine Inspection: Regularly check the mounts, brackets, and connections to ensure that everything remains secure over time. This proactive step helps prevent accidents and keeps your home theater experience uninterrupted.
Ensuring safety during and after the installation process will enhance your home theater experience, offering peace of mind while you enjoy your favorite movies.
Troubleshooting Common Issues
Resolving Installation Hiccups
Unforeseen challenges may arise when securing a mechanical projector screen to a drop ceiling. Here are common issues encountered and ways to address them effectively:
- Screen Alignment Issues: Ensuring the screen remains level is crucial for uniform projection. If the screen is misaligned, double-check the mounting bracket's position. The center of the screen should align precisely with the center lens of the projector; adjust accordingly to maintain the correct image ratio.
- Inadequate Mounting Support: Verify that the ceiling can support the weight of the mounted screen. If the ceiling structure is weak, consider reinforcing with additional mounts or supports to prevent sagging or detachment.
- Image Distortion and Throw Ratio Problems: Miscalculations in throw distance or projector lens center alignment can lead to distorted images. Ensure the throw ratio matches the room dimensions and the lens shift is correctly adjusted to project clear images on the screen.
- Screen Ripping or Wrinkling: If the screen shows signs of wear, inspect the tab tension system. Tighten or replace components as needed to maintain a smooth, tensioned screen surface for optimal viewing clarity.
- Ceiling Mount Stability: During installation, ensure the projector ceiling mount and screen brackets are securely fastened. Double-check the screws and anchors to prevent the assembly from becoming loose over time.
Consult the step-by-step installation guide if issues remain unresolved, and always prioritize safety by adhering to recommended heights and aligned positions during mounting. Address these troubleshooting aspects promptly to ensure a seamless home theater experience.