Understanding the Appeal of a 150-Inch Projector Screen
The Allure of Large Projector Screens
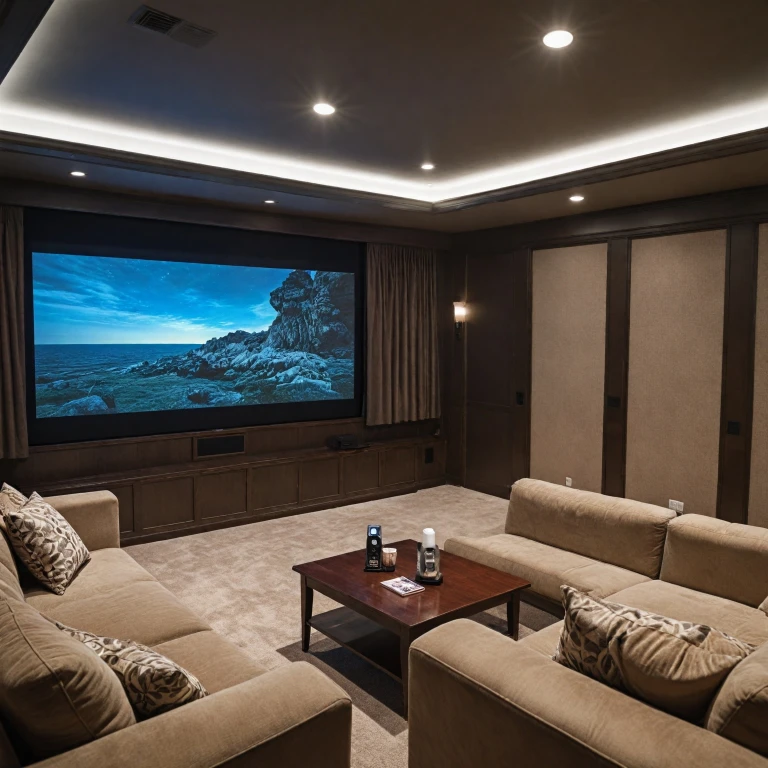
When it comes to creating an immersive home theater experience, there's something undeniably attractive about the expansive canvas offered by a 150-inch projector screen. The larger-than-life display mimics the grandeur of commercial cinema screens, allowing viewers to enjoy films in a format they were meant to be experienced. Besides sensory immersion, a large screen can significantly enhance the overall ambiance of a dedicated viewing space.
Striking the Balance Between Size and Space
One of the first considerations when opting for a 150-inch screen is ensuring it complements the dimensions of your room. While the sheer size of the screen is enticing, it's important to assess if your home theater can accommodate such grandeur without compromising on viewing angles or clarity. To aid in that decision, understanding
choosing the right size for your projector screen is crucial. This ensures that the screen doesn’t overwhelm the space or appear out of place.
Unparalleled Visual Experience
The appeal of a 150-inch projector screen also lies in its ability to provide an unparalleled visual spectacle. With the right combination of projector and screen, including materials like matte white or ALR screen options that effectively manage ambient light, viewers are treated to crisp visuals and vibrant colors. This level of detail makes every film or streaming session special.
Flexible Setup Options
Whether you’re opting for a fixed frame or exploring floor rising, electric motorized options, a 150-inch screen offers a variety of setups that can adapt to different home theaters. Elite screens, known for their quality and reliability, offer fixed and manual solutions that maximize your projector’s potential, ensuring clarity regardless of whether you're using a short throw or ultra short throw projector model.
In conclusion, the definitive allure of a 150-inch projector screen rests in its ability to transform any home environment into a cinematic realm. By thoughtfully pairing your choice of screen with the appropriate projection equipment and environment adjustments, you unlock an immersive realm of entertainment right at home.
Choosing the Right Projector for a 150-Inch Screen
Finding the Ideal Projector for a Larger Viewing Experience
When considering a 150-inch screen, selecting the right projector is essential for an optimal viewing experience. Start by evaluating the throw ratio of your projectors. For such a large screen size, you'll likely need a short throw or even an ultra short throw projector, allowing a closer installation to the screen without compromising image size.
Key Factors to Consider:
- Projector Type: Opt for projectors designed for larger screens to ensure image clarity and avoid pixelation. Ultra short throw projectors are particularly useful for limited spaces.
- Light Control: Consider an ALR screen if ambient light is a concern, as it enhances contrast and color vibrancy even in well-lit rooms.
- Screen Material: A matte white projection screen is often recommended for balanced brightness across the large surface area of 150 inches.
- Aspect Ratio: Ensure the projector supports a 16:9 or 16:10 aspect ratio, suitable for most multimedia content.
- Budget: Prices vary significantly, with brands like Elite Screens offering premium solutions. Match your choice with your budget while ensuring quality.
- Resolution: Aim for at least a Full HD projector; however, 4K projectors are ideal for providing the best details at this size.
To further enhance your setup, consider a
wall-mounted projector screen, which not only secures the screen but also improves its stability and viewing angle. Remember, the goal is to strike a balance between image quality, cost, and ease of installation. With the right approach, a 150-inch projector screen can transform your home theater into an immersive cinematic paradise.
Installation Tips for a 150-Inch Projector Screen
Setting Up Your 150-Inch Screen for Maximum Impact
When installing a substantial 150-inch projector screen, positioning is everything. Deciding between a fixed frame, manual, or electric motorized screen is pivotal, each offering different benefits and price points. The fixed frame provides a sleek, permanent fixture, while electric motorized options deliver flexibility with automatic retraction. Meanwhile, manual screens strike a balance with ease of use and affordability.
Finding the Perfect Spot
Identify a wall with ample space to accommodate the screen's large size without obstructions. Whether you select an ultra-short throw, short throw, or standard throw projector, placement relative to the screen will differ. Pay particular attention to your projector's throw distance, ensuring it harmonizes with room dimensions for the perfect image display.
Handling Ambient Light
Ambient light can significantly affect picture quality on a large screen. Opting for an ALR (ambient light rejecting) screen or a matte white screen material can mitigate light interference, enhancing contrast and color fidelity. Elite screens and other high-gain options serve to maintain vivid, accurate imagery even in well-lit environments.
Solid Framework for Stability
A reliable frame not only bolsters the screen's structural integrity but also ensures a flat projection surface. Measure carefully, considering an inch to spare on all sides for installation precision. Fixed frame screens from brands like Elite offer durability and stability, key factors when mounting such a large item.
Tools and Techniques
Preparation is key, so have the right tools on hand. A level, drill, appropriate screws, and anchors depending on your wall type are essential for securing your screen safely. Whether manually mounting the fixed frame or installing an electric setup, detailed instructions matched with manufacturer's guidelines are indispensable.
For comprehensive guidance on mounting a projector to a ceiling, especially with suspended ceiling setups, you can find insightful tips on
optimizing your home theater installation.
Optimizing Your Home Theater Space
Optimizing Your Theater Environment for an Immersive Experience
Creating a spectacular home theater experience involves more than just selecting the right projector and screen. The environment in which you set up your 150-inch projector screen plays a crucial role in enhancing your viewing pleasure. Here are some key aspects to consider:
- Ambient Light Control: The level of ambient light in your room can significantly impact image quality on your projector screen. Opt for blackout curtains or blinds to minimize light intrusion. For rooms that cannot be fully darkened, consider using an ambient light rejecting (ALR) screen, which enhances contrast by reducing the impact of ambient light, providing better picture quality even in well-lit environments.
- Projector Placement: Depending on the type of projector you select – short throw or ultra short throw projectors – placement can vary significantly. It's essential to position your projector correctly to avoid distortion and ensure the best image quality. Ensure that the throw distance matches the projection capabilities of your chosen projector.
- Seating Arrangement: To provide an optimal viewing experience, arrange seating to maintain a comfortable distance from the screen. It is commonly recommended that viewers sit at a distance of 1.5 to 2.5 times the diagonal size of the screen. For a 150-inch screen, this equates to a seating distance of around 12.5 to 20 feet.
- Acoustics: Sound quality is just as important as the visual experience. Consider adding acoustic panels or curtains to reduce echo and improve sound clarity. Placing speakers strategically around the room can deliver surround sound that complements the massive visual display of your 150-inch screen.
- Screen Material and Frame: The type of screen material and frame you choose can also impact your overall experience. Matte white screens are a popular choice for their versatility, whereas fixed frame screens offer a sturdy solution with clean lines that enhance the room's aesthetics. Choose a screen with high gain if you require increased brightness.
Enhancing the Viewing Experience
Maximizing Your Viewing Pleasure
When it comes to enhancing your projection experience, understanding how to cultivate the perfect environment is crucial. A high-quality projector and screen setup forms the core of your home theater, but the surrounding elements can make a substantial difference in the quality of your viewing.
First, consider the ambient light in your room. Too much light can wash out the image, so aim to minimize it using blackout curtains or blinds. Opt for a projector screen material that includes ambient light rejecting (ALR) properties. Such screens help maintain image clarity by reducing the impact of unwanted light.
- Screen Material: Choose a matte white or ALR screen for the best image quality. Matte white screens, like those from Elite Screens, are excellent for uniform light distribution, especially in controlled light settings.
- Sound Quality: Invest in a quality sound system that complements the visuals. This combination turns any movie night into an immersive experience.
Projection screens also have different gains that affect brightness. Selecting a screen with the right gain can enhance or distort your imagery, so consider your projector's lumen output when choosing.
Additionally, be mindful of how the projector's throw ratio influences the setup. Short throw and ultra short throw projectors give you flexibility with placement, allowing you to utilize space more effectively, whether opting for a wall-mounted or a floor rising screen.
Finally, the addition of frame details can make your fixed frame screen a visual centerpiece. The sleek design of these frames not only secures the screen but can also add an aesthetic touch to your room.
In conclusion, attention to detail in your home theater setup enhances your viewing pleasure significantly. The right choices in equipment free you from manual adjustments, letting you focus purely on relaxing and enjoying the show.
Maintenance and Care for Your Projector and Screen
Routine Care for Your Projection Setup
Maintaining the quality of your home theater projector and the 150-inch screen requires consistent and attentive care. By following these essential maintenance tips, you ensure long-lasting performance and optimal viewing experiences.
- Regular Cleaning: Dust can accumulate significantly over time, especially on the screen surface and the projector’s lens. Use a soft microfiber cloth to gently wipe the matte white screen, and a lens cleaning brush or air blower for the projector. Avoid using harsh chemicals that may damage the screen material or lens coating.
- Projector Placement: Maintaining the correct distance and angle is crucial. Carefully adjust ultra short throw projectors to prevent any misalignment that could affect image quality. Periodically check the projector mount to ensure stability, whether it’s a fixed frame setup or an electric motorized unit.
- Screen Material Check: Depending on whether you have fixed frame projector screens or an elite screens item, inspect the frame and fabric tension. Tighten and realign any loose components to provide an even display surface.
- Lamp Life Extension: Over time, projector lamps dim and require replacement. To extend their lifespan, make a habit of turning off the projector when not in use and using eco-mode settings available on many units. Monitoring usage hours can help you anticipate when a replacement is necessary.
- Environmental Adjustments: Control ambient light in your viewing area. Light rejecting or ALR screens can help mitigate this, however, dimming lights or using blackout curtains will enhance the projection image further.
- Technical Updates: Stay informed on firmware updates for your projector, which could improve overall performance, add new features, or fix known bugs. Regular updates ensure that your equipment functions at its best.
With careful attention to these aspects, you can maintain the integrity of your home theater system. Consistency in care not only preserves the projection quality but also enhances the overall longevity of your projector and screen system.