Why a precise cat 6 cable termination diagram matters for home theaters
A modern home theater projector depends on a stable network cable as much as on a bright lens. When you stream high bitrate films or play online games, a correctly wired ethernet cable using a reliable cat 6 cable termination diagram prevents stutter, lag, and audio dropouts. Poor wiring or loose connectors can quietly undermine expensive projectors and amplifiers.
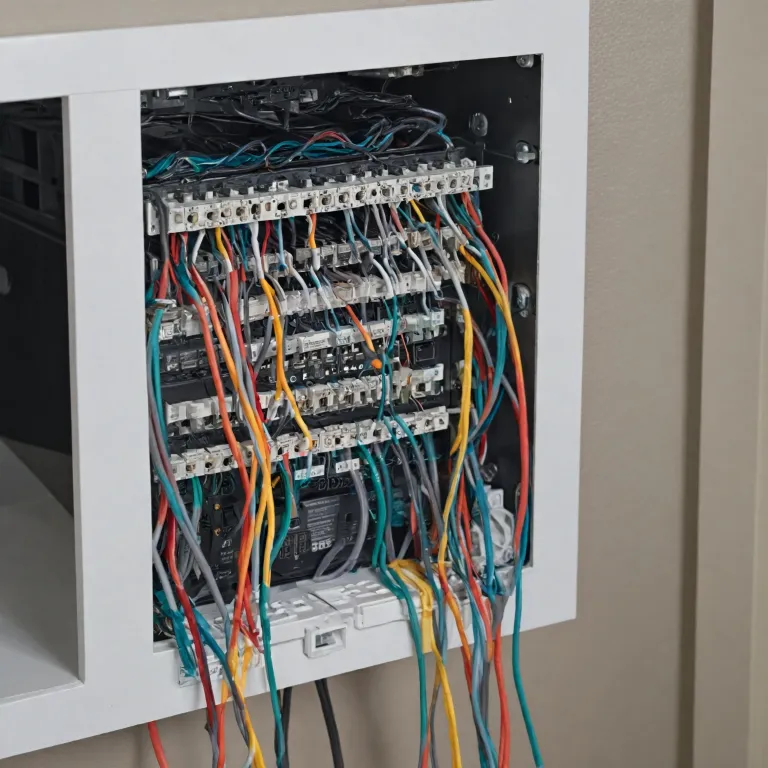
Behind the screen, several cables often converge into a compact rack, where each cable cat run must follow a consistent wiring diagram to remain traceable. A clear diagram cat layout, showing every wire, connector, and port, helps you maintain order when adding a new streaming box or media server. This structured approach to cable wiring also reduces electromagnetic interference, which is especially important when audio and video signals share tight spaces.
Cat 6 ethernet cables use twisted pairs of copper wires, and the way each twisted pair is seated in the connector determines performance. Following recognized standards for ethernet wiring, such as T568A or T568B, ensures that every cat cable and cat cables in the room behave predictably. When you respect each color code and standard, you minimize crosstalk and preserve the full bandwidth promised by cat ethernet and cat network specifications.
In a projector focused installation, a single misaligned wire in the connector can cause intermittent connection issues that are difficult to diagnose. A detailed cable diagram and wiring diagram, printed or digital, becomes your reference when checking each step of termination. Treat the cat wiring process with the same care you give to projector placement and screen calibration, because the network connection is now part of the image chain.
Understanding cat 6 standards, color codes, and wiring diagrams
To use a cat 6 cable termination diagram effectively, you must understand the underlying standards and color conventions. Cat 6 ethernet cable relies on four twisted pairs, and each pair has a specific color code that must match the chosen wiring standard from end to end. Mixing standards on different connectors can turn a high quality ethernet cable into a source of mysterious network problems.
The two dominant standards for ethernet wiring are T568A and T568B, and both are acceptable for home theater networks. What matters is that every network cable, every cable cat run, and every connector in the chain follows the same standard consistently. When you examine a wiring diagram, you will see each wire position numbered, with the corresponding color and pair indicated for clarity.
In practice, many installers prefer T568B for cat wiring because it is widely used in residential ethernet cables. A good cable diagram will show the order of colors from left to right when looking at the connector with the clip facing away. This visual reference helps you align each wire correctly before using a crimping tool to secure the connectors.
For a projector heavy setup with multiple streaming sources, keeping a printed wiring diagram near your rack can save time during upgrades. If you experiment with advanced projectors from brands covered in this guide to Xgimi projector options for home cinema, you will likely add more ethernet cables over time. A consistent cat 6 cable termination diagram and strict adherence to the chosen standard protect your investment in both networking gear and display hardware.
Step by step termination of a cat 6 ethernet cable for projectors
Terminating a cat 6 ethernet cable for a home theater projector begins with planning each step carefully. First, measure the required length of cable, allowing extra slack so that the network cable does not strain the connector when the projector is moved or ceiling mounted. Cut the cable cleanly, then use a dedicated tool to strip about 2 to 3 cm of the outer jacket without nicking the inner wires.
Once exposed, you will see four twisted pairs, each with its own color code that must match your chosen wiring diagram. Untwist only as much wire as necessary, because excessive untwisting can degrade performance in high bandwidth cat network applications. Arrange the wires according to the standard, aligning each wire with the correct position shown in your cable diagram or diagram cat reference.
Next, trim the wires to an even length and insert them gently into the connector, ensuring every wire reaches the end of the channel. Verify that the color order matches the wiring cat standard before using the crimping tool to press the connectors firmly onto the cable. A proper crimping step secures both the electrical connection and the strain relief, which is vital for cables connected to ceiling mounted projectors.
After crimping, use a cable tester to confirm that each wire has a solid connection and that there are no shorts or reversed pairs. This simple tool can prevent hours of troubleshooting when integrating advanced display hardware, such as systems highlighted in this guide to enhancing your home theater with NEC projectors. By following each step of the cat 6 cable termination diagram, you ensure that every ethernet cable in your cinema room performs reliably.
Managing multiple cables, crossover runs, and hidden wiring in cinema rooms
Home theater rooms often hide a complex web of cables behind walls, ceilings, and cabinets. When several cat cables and ethernet cables run together, a clear cat 6 cable termination diagram helps you track each network cable from the router to the projector, media player, or AV receiver. Labeling both ends of every cable cat run according to the wiring diagram simplifies maintenance and future upgrades.
In some advanced setups, you may still encounter a crossover cable used to connect two devices directly without a switch. Modern equipment often supports auto sensing ports, but understanding crossover wiring remains useful when interpreting an older cable diagram or troubleshooting legacy gear. The wiring cat pattern for a crossover cable intentionally swaps specific pairs, and this must be reflected accurately in any cable diagram you rely on.
When routing wires through walls, keep ethernet cable separated from power lines to reduce interference and preserve signal integrity. Use low voltage brackets and conduits that allow you to pull new cables later without damaging existing wires or connectors. A well documented wiring diagram, including each connector type and color code, becomes essential when you cannot easily access the hidden cable wiring.
For ceiling mounted projectors, consider running two cat ethernet lines to each location, even if you initially terminate only one. This redundancy, clearly marked on your cable diagram and cat wiring plan, provides flexibility for future upgrades such as networked control systems or additional streaming devices. To see how robust networking supports demanding projection systems, review this analysis of an Optoma DLP projector for dedicated home theaters.
Testing, troubleshooting, and maintaining cat 6 connections for projectors
Even a carefully followed cat 6 cable termination diagram cannot prevent every issue, so systematic testing is essential. After terminating each ethernet cable, use a cable tester to verify continuity, correct pair order, and the absence of shorts or split pairs. This quick step confirms that your wiring diagram has been translated accurately into physical wires and connectors.
If a projector fails to obtain a stable network connection, start by checking the connector ends for proper seating and visible color order. Compare the wire positions against your chosen standard and the original cable diagram, ensuring that both ends of the network cable follow the same pattern. A mismatch between standards can still pass a basic continuity test but cause intermittent performance problems under heavy streaming loads.
When diagnosing more subtle issues, such as occasional buffering or handshake failures with streaming services, inspect the length and routing of the cables. Excessive bends, tight staples, or proximity to power cables can degrade the performance of cat ethernet and cat network links. In some cases, reterminating the ends with fresh connectors and a precise crimping tool can restore full bandwidth.
Document every change you make to the wiring cat layout, updating the cable diagram and wiring diagram for future reference. Over time, this disciplined approach to cable wiring and ethernet wiring builds a reliable infrastructure that supports new projectors, media players, and control systems. Treat the cat 6 cable termination diagram as a living document that evolves with your home theater rather than a one time installation sketch.
Aligning projector performance with robust cat 6 network design
High performance home theater projectors reveal the strengths and weaknesses of your network design. When a cat 6 cable termination diagram is executed correctly, the ethernet cable becomes an invisible backbone that supports 4K streaming, low latency gaming, and responsive control apps. Any flaw in cable wiring, from a misaligned wire to a poorly crimped connector, can surface as visible artifacts on the screen.
To align projector capabilities with network reliability, start by mapping every cat cable and network cable run on a detailed cable diagram. Note the length, destination, and standard used for each connector, ensuring that all cat ethernet and cat network segments follow the same wiring cat pattern. This level of documentation allows you to correlate specific cables with specific devices when diagnosing performance issues.
Consider the future when planning cable termination, because projector technology and streaming formats continue to evolve. Installing extra cables and leaving them terminated according to the same cat 6 cable termination diagram gives you headroom for new devices without reopening walls or ceilings. Use quality connectors, a calibrated crimping tool, and a reliable cable tester to ensure that every wire and pair meets the required standards.
In a refined cinema room, the audience never sees the twisted pairs, color code charts, or wiring diagram that support the experience. They only notice that the film starts instantly, the image remains stable, and control commands respond without delay. That seamless performance rests on the quiet precision of each ethernet wiring decision, from the first planning step to the final connector click.
Key statistics for cat 6 networking in home theaters
- Cat 6 ethernet cables are typically rated for up to 1 Gbit/s over 100 m runs when terminated according to recognized standards and a precise wiring diagram.
- Properly installed cat 6 cable with correct twisted pair management can support 10 Gbit/s speeds over shorter distances, which is valuable for high bitrate home theater streaming.
- Industry testing shows that even a 13 mm increase in untwisted wire length near the connector can measurably increase crosstalk and reduce overall network performance.
- Using a cable tester after every termination can reduce long term troubleshooting time by more than half in complex home theater installations.
- Structured cabling designs that document every cable, connector, and color code typically extend the usable life of a home theater network by several upgrade cycles.
Common questions about cat 6 cable termination for home theater projectors
How important is following a cat 6 cable termination diagram for a single projector?
Even for a single projector, following a cat 6 cable termination diagram is crucial because it ensures that the ethernet cable meets performance standards. A correctly wired connector preserves the integrity of the twisted pairs and the specified color code, which directly affects bandwidth and noise immunity. Skipping the diagram increases the risk of wiring errors that may only appear under heavy streaming loads.
Should I choose T568A or T568B for my home theater wiring?
Both T568A and T568B are valid standards for cat 6 cable, and performance is equivalent when implemented correctly. The key is to select one standard, document it clearly on your wiring diagram, and apply it consistently to every connector and network cable. Many residential installers prefer T568B, but consistency matters more than the specific choice.
Do I still need crossover cables in a modern home theater network?
Most modern switches, routers, and projectors support auto sensing ports that eliminate the need for dedicated crossover cables. However, understanding the crossover wiring pattern remains useful when reading older cable diagrams or repurposing legacy equipment. If you do create a crossover cable, label it clearly and document it on your cable diagram to avoid confusion later.
How long can a cat 6 ethernet cable run to a ceiling mounted projector?
For standard gigabit ethernet, cat 6 cable runs can typically reach up to 100 m when terminated according to the proper wiring cat standard. In a home theater, projector runs are usually much shorter, which provides additional margin for performance. Always include the full path in your cable diagram, and avoid unnecessary bends or tight bundles that could affect signal quality.
Is it worth investing in a cable tester and crimping tool for DIY installations?
Investing in a quality crimping tool and cable tester is highly recommended for anyone terminating multiple cat cables in a home theater. These tools help you apply the cat 6 cable termination diagram accurately, verify each connection, and reduce the risk of hidden wiring faults. Over time, the reliability and reduced troubleshooting effort usually justify the modest cost of the tools.